Friday, July 8, 2016

Worcester Textured Scarf


The warp was beamed on, the heddles and reed were sleyed and tied on a table top set up.  One purpose of this particular warp was to use a variety of colors, sizes of thread, textures, and to intentionally leave spaces in the reed.


Here is a side view of the table top set up.

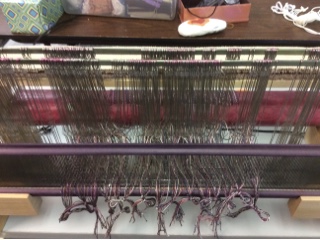
The warp was transferred to the loom.


I love the colors.  One woman from California said she thought I purchased it because it was so lovely.


The pink and yellow yarn at the bottom was hand spun on the bobbin winder.  I think I will need more practice before I end up with even threads.


Here is part of the project on the loom.


The thick brown section has many loops.


The purple, white and pink is more roving added into the project.  I twisted two pieces of roving together to get a mock braid.  


I used some "novelty yarn" in the middle of the project.  You can see the floor between the threads because I wove it loosely.


In the pink section I wove one side with loops and the other side with straight weave.  You make W's in the thread in one side to get the loops and go straight across to get the traditional weave.  I love the texture.


Ridiculously Happy Saori Pouches


I made two Saori pouches while at Saori Worcester.  I ironed on black fusible interfacing, cut the fabric, sewed on piping for the larger pouches, sewed color coordinated zippers into the pouches and squared off the bottom of the larger pouch.  

The pouches make me ridiculously happy.  They are bright and cheery and look so tailored!

Sunday, June 26, 2016

Saori Hat (One Seam!!!!)


I wove yardage for a second No Sew Hat (the sequel) but decided to sew it instead. 


Front view of the hat.  


I knotted the fringe from the beginning of the piece to the the fringe from the end of the piece and made a Mohawk.  I wasn't sure if the pink would work , but I like it as an accent.  


I turned the fabric inside out.   I found the mid point of the top and folded the outside to the center and made a half inch seam across the top.  Then I turned it right side out.  

My new friends at Saori Worcester were very excited to see how easy the hat was to make.  I think there are many one seam hats in their future.  


Herringbone Saori Style


Here is the warp. The warp has two gray threads alternating with two purple threads.  There is a section in the middle with all gray threads.  That is the Saori in me - making up your own pattern or lack thereof.


Here is a portion of the project still on the loom.  I had to double up my yarn for each shot because the pattern was too small otherwise.  So I did one shot of 1/3 in gray (2 threads) followed by one shot of 2/4 in gray (2 threads).  Then I switched to green or pink/purple mixed.


I also mixed in some basket weave (see the pink and purple section on the right).


Portions of the scarf with side fringe.


End section with braided fringe on the right.


Finished scarf on our head model, Saki.


Wednesday, June 22, 2016

Labradorite Tunic

My favorite rock is Labradorite.  Which is named for Labrador, Canada, but can also be found in the Adirondacks of New York.  It is typically an iridescent blue and green colored stone that is polished into cabashons. 


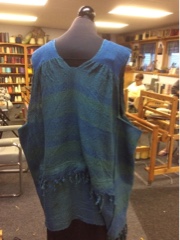
This is my weaving inspired by the rock.  I used a combination of blue and green cotton thread for the warp and the weft.  My plan is to make it into a tunic adding the fabric to the top. Note, I used stretchy yarn for the straps.  If you haven't used stretchy yarn yet you have to try it.  But you are going to wish that you had octopus arms because you have to stretch the yarn taunt before you weave it in.  I was trying to keep both sides going at the same time.  I did a pretty good job of making them even.  One thing that worked out particularly well was weaving an inch and a half of regular yarn before starting the stretchy yarn.  What it did was pleat the fabric near the blue stretchy straps.


The first thing I did was measure across the width of the top part and cut a section out of the fabric.  Then I cut the rectangle in half to make two smaller rectangles.  I sewed the rectangles to the underside of the back and front of the top.


I will probably add some pleats under the arms or other details but the overall shape is done.   I recieved a lot of praise for my use of stretchy yarn for the straps.


This is the back side of the tunic.  


Fibonacci Finished Jumper

First things first.  Five yards is a lot of weaving.... Until you go to sew something out of it.  Here is the fabric:


I figure I wove about a yard a day for five weekend days.  On one or more evening I had to stop weaving so my parents could go to sleep.  I was a woman with a deadline.  I had to finish my yardage before my intensive at Saori Worcester.  Thanks to Jame, sis, for letting me use her programmable washing machine.  The fabric has to be pre-washed for shrinkage prior to sewing otherwise my dress would fit a Kokeshi doll.


Last night I arrived in Worcester and showed my fabric to Mihoko and showed her a few photographs that I pinned in Pinterest that I liked.  Particularly, there was one sewn on the bias (diagonal) with some pleating in the front.  There is always a moment of right before you take a pair of scissors to the fabric that panic sets in.  You sew a straight line on either side of the cutting line and then pause....  After you actually cut the fabric and it doesn't fall apart in a clump of threads then you can start to breathe again.


This is the front of the jumper.  The section on the lower left is pleated to the section on the right.  The hem is asymmetrical, if you square up both side the bottom is actually straight across, it because it is constructed on the bias it appears longer.


This is the back side of the jumper.  I decided not to pleat the back of the jumper because it would take away from the patterning.  The neckline is created by folding over the fringe end on the front panel and sewing it to the folded fringe end on the back.

There is some seaming around the right arm hole, but the seam on the left is just the front overlapped the back.  

As mentioned above, five yards does not go as far as you would like so, I use the word JUMPER loosely.  It is probably more like a tunic since it will need leggings underneath it.


Sunday, June 5, 2016

Spreading Saori Joy


My friend Faith is a Saori Guinea pig.  She came with me to my parents house and I showed her some of the Saori techniques I have already learned.   The warp was already on the loom.  After showing her how to throw the shuttle and switch treadles I let her loose with a variety of weft items including yarn, ribbon, roving, and cloth strips.   


I am amazed by the beauty of her project.  She has a good eye for color and proportion.


The above photograph is her finished wall hanging.  Gorgeous.